Getting Started
Introduction
I often find that I have a collection of objects which I want to present to the user in some sort of tabular format. It could be the list of clients for a business, a list of known FTP servers or even something as mundane as a list of files in a directory. User interface-wise, the ListCtrl is the perfect control for these situations. However, I find myself groaning at the thought of using the ListCtrl and secretly hoping that I can use a ListBox instead.
The reason for wanting to avoid the ListCtrl is all the boilerplate code it needs to work. There is the basic “list building loop” insert the data item, add the subitems, call SetItemData() with some integer that will tell me which data object the row is showing.
If I want to allow sorting, I can either write everything from scratch (again), or I can do the work of setting up the ‘itemDataMap’ so that ColumnSorterMixin will work.
When the user right clicks on the list, I have to figure out which rows are selected, and then maps those rows back into the model objects I am interested in. Neither of these tasks are obvious if you don’t already know the tricks.
The ObjectListView was designed to take away all these repetitive tasks and so make a ListCtrl much easier to use.
Seeing the big picture
If you are a visual person, the process I’m about to explain is this:
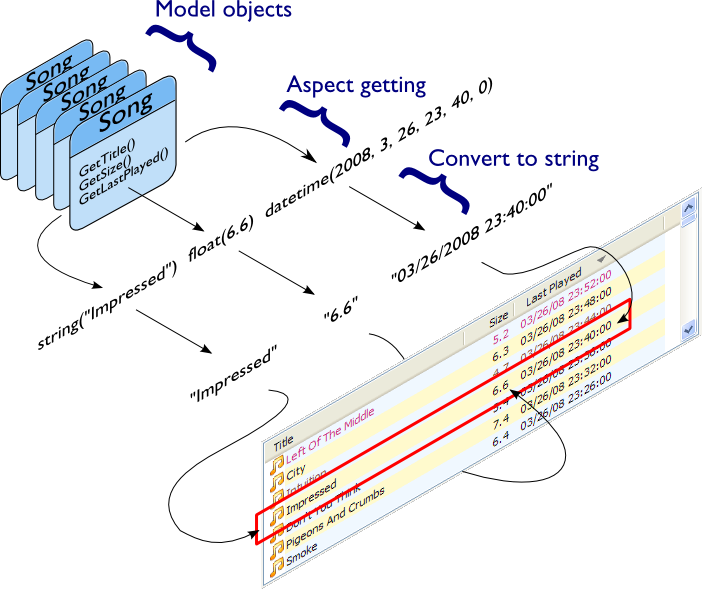
You give the ObjectListView a list of model objects. It extracts aspects from those objects, converts those aspects to strings, and then builds the control with those strings.
Keep this image in mind when reading the following text.
Mental gear shift
This is important. You need to understand this.
ignored
Before trying to use an ObjectListView, you should understand that it is different to a normal ListCtrl. A normal ListCtrl is essentially passive: it sits there, and you poke and prod it and eventually it shows you want. An ObjectListView is much more active. You tell it what you want done and the ObjectListView does it for you.
An ObjectListView is used declaratively: you state what you want the ObjectListView to do (via its configuration), then you give it your collection of model objects, and the ObjectListView does the work of building the ListCtrl for you.
This is a different approach to using a ListCtrl. You must get your mind around this, especially if you have done any ListCtrl programming before (See Unlearn you must).
The crucial part of using an ObjectListView is configuring it. Some of this configuration is done on the ObjectListView itself. However, most of this configuration can be done on the columns that are used within the list. Within each column definition, you say what the column should be called, what data it should show, and how that data is to be formatted (there is more, but that’s enough to start with).
Once the columns and control are configured, putting it into action is simple. You give it the list of model objects you want it to display, and the ObjectListView will build the ListCtrl for you:
self.myFirstOlv.SetObjects(myListOfTracks)
Unlearn you must
This section is for those who are familiar with using a ListCtrl.
ignored
For those of you who have struggled with a ListCtrl before, you must unlearn. An ObjectListView is not a drop in replacement for a ListCtrl. If you have an existing project, you cannot simply create an ObjectListView instead of creating a ListCtrl. An ObjectListView needs a different mindset. If you can perform the mind-mangling step of changing your thinking, ObjectListView will be your best friend.
If you find yourself inserting rows, changing subitems, or calling SetItem() or its friends, you need to stop - you are being seduced to the dark side. An ObjectListView does all that work for you. You tell it the aspects of each model object you want to show (via the ColumnDefn objects), specify any formatting and then you give it the list of objects to show.
Resist the temptation to add, edit, remove, or otherwise mess with the rows of an ObjectListView – it will not work.
There is also no need to hide information in each row. Old style ListCtrl programming often required attaching a key of some sort to each row, so that when the user did something with a row, the programmer would know which model object that row was related to. This attaching was often done by creating one or more zero-width columns, or by calling SetItemData() with some integer that uniquely identified the model object.
With an ObjectListView , you do not need to do this anymore. The ObjectListView already knows which model object is behind each row. In many cases, the programmer simply uses the GetSelectedObjects method to find out which model objects the user wants to do something to.
This bit goes here, that bit goes there
The first configuration step is to tell each column which bit (called an “aspect”) of your model object it is going to display. This is done through the column’s valueGetter attribute.
In the most common case, the valueGetter attribute of the column is the name of the attribute that the column should display.
Imagine that we were writting an application that managed a MP3 music library. A central part of this application would be the list of tracks available in the library. Your central model class, Track, might look like this:
class Track(object):

    def __init__(self, title, artist, album, lastPlayed, sizeInBytes, rating):
        self.title = title
        self.artist = artist
        self.album = album
        self.lastPlayed = lastPlayed
        self.sizeInBytes = sizeInBytes
        self.rating = rating

    def GetSizeInMb(self):
        return self.sizeInBytes / (1024.0*1024.0)
To show the title in a column, you would make a ColumnDefn like this:
titleColumn = ColumnDefn("Title", "left", 120, "title")
This says, “Make a left-aligned column, 120 pixels wide, with a title ‘Title’, which shows the aspect ‘title’ from each model object.”
The definitions for the artist and the album are similar:
artistColumn = ColumnDefn("Artist", "left", 120, "artist")
albumColumn = ColumnDefn("Album", "left", 120, "album")
Converting to strings
OK, we’ve told our first few columns which bits of data they should display. For the title, artist, and album columns, this is all that is necessary. But for the “Size In MBs” and “Last Played” columns, there is something else we need to consider: how to convert our bit of data to a string.
A ListCtrl control can only display strings. Everything else - booleans, integers, dates, whatever - has to be converted to a string before it can be given to the ListCtrl. By default, the ObjectListView converts data to strings using the string format operation, more or less like this: "%s" % aspectValue
You can use a different format string (instead of the default “%s”) by setting the stringConverter attribute on the column definition. If the stringConverter attribute is a string, its value will be used as the format string instead of “%s”.
So for our “Size In MBs” column, we are only interested in one decimal places, so we would define that column like this:
sizeInMbColumn = ColumnDefn("Size (MB)", "center", 100,
                            "GetSizeInMb", stringConverter="%.1f")
Notice that here we used a method name (“GetSizeInMb”) instead of an attribute name. The column definition can handle either (actually, it can handle quite a bit more than that, but that’s for later).
If the aspectValue is a date or time, then instead of using the plain % operator, the stringConverter is used as the parameter to strftime method, like this: dateTimeAspect.strftime(column.stringConverter)
So, we would configure our “Last Played” column like this:
lastPlayedColumn = ColumnDefn("Last Played", "left", 100,
                              "lastPlayed", stringConverter="%d-%m-%Y")
Put it all together and what have you got?
Putting all these columns together, we put them into use via the SetColumns method:
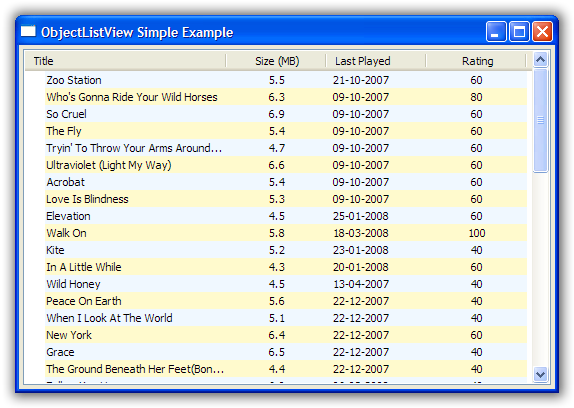
self.myFirstOlv.SetColumns([
    ColumnDefn("Title", "left", 120, "title"),
    ColumnDefn("Size (MB)", "center", 100, "GetSizeInMb", stringConverter="%.1f"),
    ColumnDefn("Last Played", "left", 100, "lastPlayed", stringConverter="%d-%m-%Y"),
    ColumnDefn("Rating", "center", 100, "rating")
])
[I dropped the Artist and Album columns so that the screen shot below is smaller].
Once we have defined the columns, we set the whole thing into action with SetObjects:
self.myFirstOlv.SetObjects(self.listOfTracks);
And we should get something like this:
What have we achieved?
Underwhelmed? Admittedly, it’s not much to look at, but be patient. Also, consider how much work you had to do to make it happen: some column definitions and one line of code. It doesn’t look so bad now, does it?
With those column definitions, we have a ListCtrl that shows the title, date last played, size (in megabytes) and rating of various tracks in your music library. But, actually, we have quite a bit more than that.
Without any extra work, sorting just works. Clicking on the column headers will sort and reverse sort the rows. The sort is accurate for the data type: when sorting by size, a song of 35 megabytes will come after a song of 9 megabytes.
The control also understands ‘model object’ level operations. So, we can ask the control for the tracks that are selected (via the GetSelectedObjects method). We can refresh the information about one or more tracks (using RefreshObjects method)
We also have the access to some of the nice builtin functions that ObjectListView provides.
Adding some images
OK, that’s good, but any real ListCtrl needs to be able to put little icons next to the text. That is our next task.
A ListCtrl can only ever show images that exist in its image list. To make an image available to an ObjectListView, you call AddImages method:
musicImage = self.myOlv.AddImages(Images.getMusic16Bitmap(), Images.getMusic32Bitmap())
This registers two versions of the same image to the ObjectListView. The second bitmap is only used when the list is in Large Icon view. If your control is never going to be put into Large Icon view (for example, it’s always in Details view), you don’t need to register the second image.
The AddImages method return an integer that identifies the image. Referring to images via their index is a bit of a pain. It’s easier to register named images, via AddNamedImages and then use the names of the images:
self.myOlv.AddNamedImages("user", Images.getUser16Bitmap(), Images.getUser32Bitmap())
self.myOlv.AddNamedImages("group", Images.getGroup16Bitmap(), Images.getGroup32Bitmap())
Once we have an image registered, we can use it in the control. This is done using the imageGetter attribute of a column. When a column wants to determine what image should be shown, it uses the imageGetter attribute. The simplest case is to assign a constant to this attribute. This will give every cell in the column the same image, like this:
titleColumn = ColumnDefn("Title", "left", 120, "title", imageGetter=musicImage)
This is easy, but limited. Much more useful is giving a callable as the imageGetter (notice that here we’re using image names):
def artistImageGetter(track):
    soloArtists = ["Nelly Furtado", "Missy Higgins", "Moby", "Natalie Imbruglia",
                   "Dido", "Paul Simon", "Bruce Cockburn"]
    if track.artist in soloArtists:
        return "user"
    else:
        return "group"

artistColumn = ColumnDefn("Artist", "left", 120, "artist", imageGetter=artistImageGetter)
If the imageGetter is a callable, it must accept a single parameter, which is the model object whose image is being sought. It should return the name or the index of the image to display, or -1 if no image should be shown.
The imageGetter can also be given the name of an attribute or a method of your model object. This is useful when the model objects themselves know which image they should use.
Smarter string conversions
Being able to change the stringConverter to a different format string is useful, but there are just some cases that need something more substantial.
In our Track class, the actual size of the track is stored as sizeInBytes. It would be nice if we could show the size as “360 bytes”, “901 KB”, or “1.1 GB” which ever was more appropriate.
To do this, we can set the stringConverter attribute to be a callable, like this:
def sizeToNiceString(byteCount):
    for (cutoff, label) in [(1024*1024*1024, "GB"), (1024*1024, "MB"), (1024, "KB")]:
        if byteCount >= cutoff:
            return "%.1f %s" % (byteCount * 1.0 / cutoff, label)
    if byteCount == 1:
        return "1 byte"
    else:
        return "%d bytes" % byteCount

sizeColumn = ColumnDefn("Size", "center", 100, "sizeInBytes", stringConverter=sizeToNiceString)
If stringConverter is a callable, it must accept a single parameter, which is the value to be converted (note: it’s the value not the model object that is given to the converter).
Putting all these bits together, we now have something that looks like this:
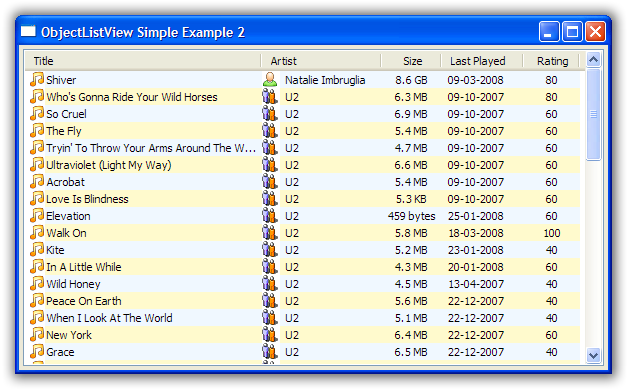
Hey! That’s starting to not look too bad.
Playing with groupies
Moving up a gear, we can build on these basic configurations to produce a GroupListView, which is a wx.ListCtrl which has collapsible groups.
The code for this example is in “GroupExample.py” The first thing to notice is that the code for this example is almost identical to the code from example 2. There is very little extra needed to make a GroupListView.
To make a GroupListView work, the control needs to know how to collect the model objects into different groups. This is done by getting a “group key” for each object. All objects with the same group key are placed in the same group.
The “group key” for an object is normally whatever value the object has in the “group by” column. So if the group list is being grouped by the “Artist” column, the group key for a track will be, for example, “Coldplay” or “Nickelback”. This process can, of course, be customised, using the groupKeyGetter attribute of OLVColumn – but that’s a story for another time. See Using a GroupListView for full information.
One common pattern is for objects to be grouped by the first letter of a string value, for example on the “Title” column, all tracks starting with “A” would be grouped together. This is so common that there is built-in way to do it, as it shown in the first column in the example:
ColumnDefn("Title", "left", 120, "title", imageGetter=musicImage, useInitialLetterForGroupKey=True)
Putting all these bits together, we now have something that looks like this:

Now that’s cool!
And they’re off and running
Well done! You’ve made it to the end of the tutorial. You should by now have a reasonable grasp of some of the things an ObjectListView can do, and how to use it in your application.
If you need further help, you can look at the Cookbook and the Forum for those questions that just don’t have answer anywhere else.
Don’t forget: Use The Source Luke! You have all the source code. If you can’t figure something out, read the code and see what is actually happening.